Stock Controls
- Deliveries
- Transfers
- What is a transfer & Why do we use them?
- How to Complete a Transfer
- Approving a Transfer
- Deleting a Transfer
- Revenue
- Allowances
- Product Settings
- Spot Checks
- Recipe Settings
- What are Recipe Settings and Why Do We Use Them?
- How to Update Recipe Settings
- EPOS Codes
- Adding a Recipe
- Stock Audits
- What is a Stock Audit
- Starting a Stock Audit
- Creating Countsheets
- Importing Completed Countsheets
- Reviewing the Completed Stock Audit
- Audit Result
- Product Result
- Reports
- Deleting a Stock Audit
- Completing a Food Audit
- Uploading Till Sales
- Overview & Key Terms
Deliveries
What is a Delivery?
A delivery is where a site has received products in order to use it. An example of a delivery would be for liquor stock. These deliveries need to be entered onto the system correctly, in order for any stock takes to be accurate and relevant.
Enter a Delivery
To enter a delivery, navigate to the Deliveries Tab on the left-hand side. Then, click on the Create Delivery in the top-right. This will bring up a pop up. Select the outlet in which the delivery is relevant to. Then, enter the supplier name and the Delivery number that is associated with the delivery then select ‘Create Delivery’.

This will open a new screen, in which you can enter the invoice number. You can then search for the products, enter the quantity and click ‘add’.

This is automatically saved so once all products are in you can click on the Delivery Summary to take you back to the main delivery screen.
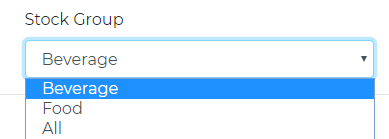
To change the stock group, simply navigate to the 'Stock Group' dropdown at the top left hand of the page. From here, you will be able to select from which stock group you are creating a delivery for, i.e. Food/Beverage Stock.
Edit a Delivery
To edit a delivery, navigate to the Deliveries Tab on the left-hand side. Then, find the relevant delivery and click ‘Edit’.

From this screen you can see all items that have been delivered into the system. This is where you can amend any delivered quantities and add new products. You will need to click on 'delivered products' to edit the already delivered quantities, or 'product search' for any further items.

When you click on 'Delivered Products', all items on the specific delivery will show with their relevant cost price and quantities. these can be amended by clicking in the correct box and typing in the correct value.

Deleting a Delivery
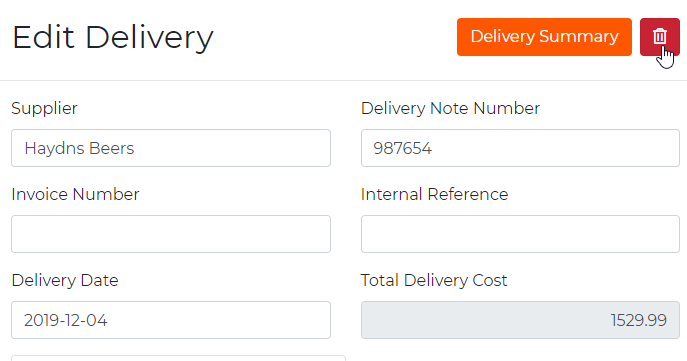
To delete a delivery, click on the 'Edit' link on the delivery that you want to delete.

To continue with the deletion of this delivery, simply click on the bin icon at the top of the page, as seen below;
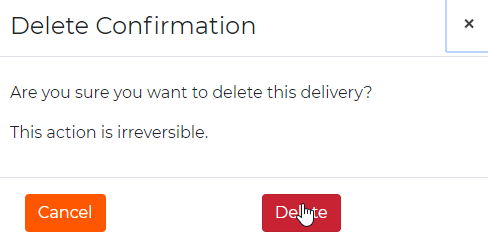
Once this icon has been clicked, a further screen will appear in order to confirm the deletion. This action cannot be reversed, so ensure that it is the correct delivery that is being deleted.
Transfers
What is a transfer & Why do we use them?
A transfer is used to move stock from one unit to another. Stock will be delivered into an outlet (I.e. the cellar). These items would then have to be moved to the outlet/unit in order for them to be sold/used. To have to stock in these areas, a transfer must be completed on the system. This means that when completing a stock take, true results for every outlet can be given. Any risk outlets/units can be identified and investigated, as long as all transfers have been completed fully and truthfully.
How to Complete a Transfer
To complete a transfer, navigate to the transfer tab on the left-hand side of the page. Then select ‘Start Transfer’ on the top right-hand side. From the pop up, select the outlet where the stock is coming from, where the stock is going, the date of the transfer and a reference in order to be able to identify the transfer from a glance.

When you press ‘Start’ it will bring up a list of all products that are held in the outlet you are moving stock from. Use the search function at the top of the page to find the items of stock that need to be moved. Within this product list, it will show the quantities of products that are in the outlet. You will only be able to move stock from this outlet if there is stock available. If you enter a value greater than what is in stock, the ‘Save’ button will disappear. Once the correct value is entered, you will be able to click ‘save’ at the bottom of the page. This will send the transfer across to the opposing outlet to approve.

When completing a transfer, you can choose which Stock Group the stock is being transferred from. For example, this can be Beverage stock or Food stock. To change the group, simply go to the 'Stock Group' drop down in the top left hand corner and select the correct group.

Approving a Transfer
To approve a transfer, return to the Transfer Summary page and click ‘View’ on the relevant transfer.

On this pop up, you are able to review what products have been requested.
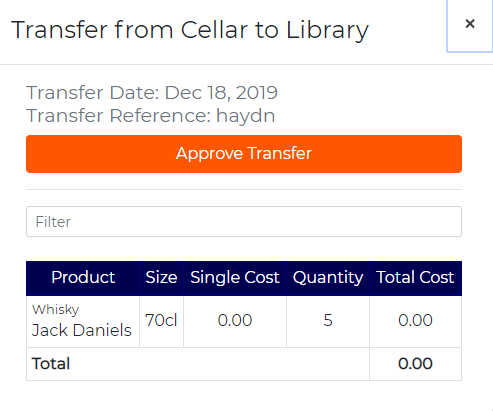
Once the transfer has been reviewed, you can approve the transfer at the top of the pop up.
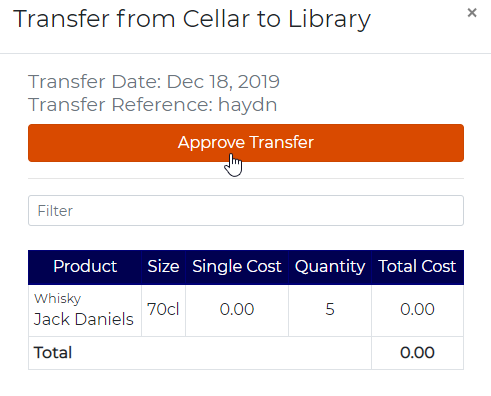
This transfer will then appear in the ‘completed transfers’ section of the Summary page.

Deleting a Transfer
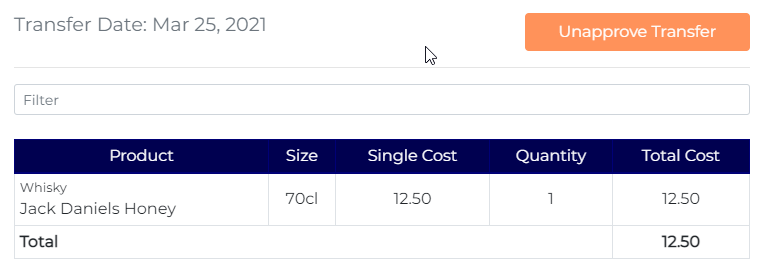
To delete a transfer, go to the Transfer Summary page and select ‘View’ on the relevant delivery.

At the bottom of this pop up, there will be an ‘Unapprove Transfer’ button. This will then delete the relevant transfer from having an impact on the stock holding. This transfer will now appear in the ‘Deleted Transfer’ section of the summary page.
The transfering site will then see this transfer within their own system and can amend/delete where necessary

Revenue
What is Revenue?
Revenue is the Actual Receipts that the business has received in exchange of goods and services. This could be in regards to Liquor sales, food sales or any other service the site may offer
Entering Revenue
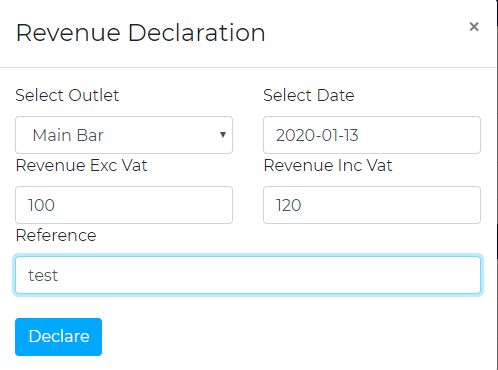
To enter Revenue, navigate to the ‘Revenue’ tab on the left-hand side. Then select ‘Declare Revenue’ in the top right-hand corner. Then, select the relevant outlet and enter the revenue amount. This can be entered including VAT or Excluding VAT. The other box will automatically calculate the VAT rate and populate with the value.
Deleting Revenue
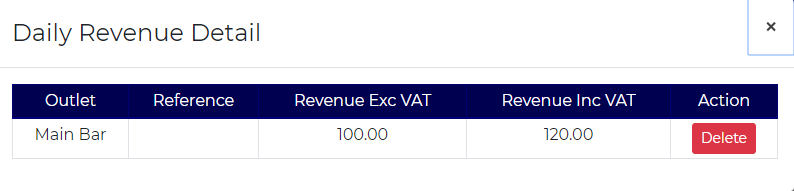
To remove a revenue entry, navigate to the Revenue Tab. Then select ‘View’ on the relevant Revenue entry. This will then bring up a pop up. A list of all of the revenue entries for that particular day will appear. These can be individually deleted as and when it is required.
Allowances
What is an Allowance & Why do we Use Them?
An allowance is a monetary value that will normalise the retail result. One example of an allowance is for cocktail sales. For example, if a shot of vodka costs £3.00, and a shot of gin costs £3.00. a cocktail using these two ingredients is charged at £5. This means that £1 is being lost every cocktail sold, so this value is given as an allowance. If 100 cocktails were sold, the allowance would be £100 (100 x £1).
Adding an Allowance
To add an allowance, navigate to the allowance tab on the left-hand side of the page. Then select ‘Declare Allowance’ on the top right-hand side. From the produced box, select the outlet, allowance type and enter the value. This box also lets you enter a reference if you want to enter one. Then select ‘Declare’ This allowance has now been added.
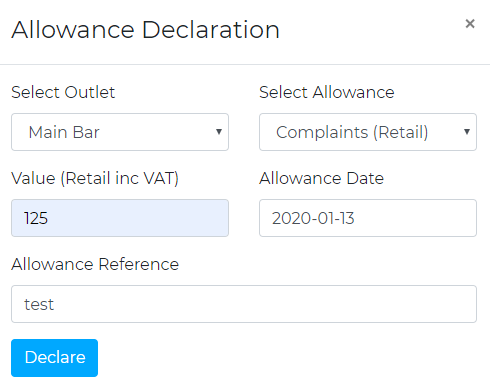
If it is a Cost Allowance, this should be entered excluding VAT. Retail allowances should include VAT.
Deleting an Allowance
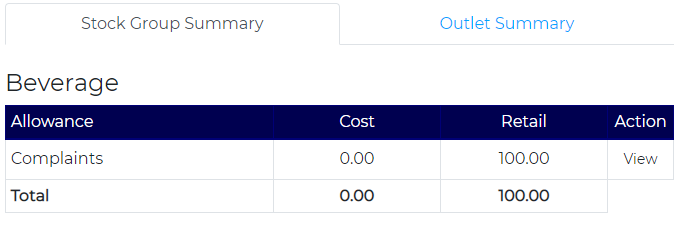
To delete an allowance, navigate to the allowance tab on the left-hand side of the page. You can now see a list of allowances and their values.
On the right-hand side, there is text saying ‘View’. If you select this, a box will appear with all the different allowances for that allowance type.
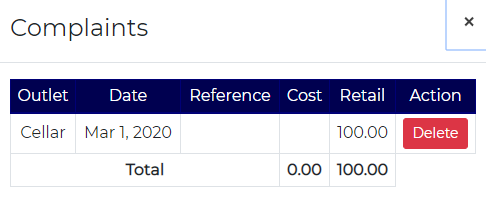
From here you can delete the particular allowance you want.

Once this has been clicked, the allowance will disappear.
Product Settings
What Are Product Settings
Product settings are where products have their serving measures, cost prices and retail prices updated.
product
/ˈprɒdʌkt/
Learn to pronounce
noun
an article or substance that is manufactured or refined for sale.
"food products"
settings
the place on a mobile phone or other electronic device where you can set various functions:
Change Retail Settings
When you have clicked edit, a list of all products will appear, as shown below;
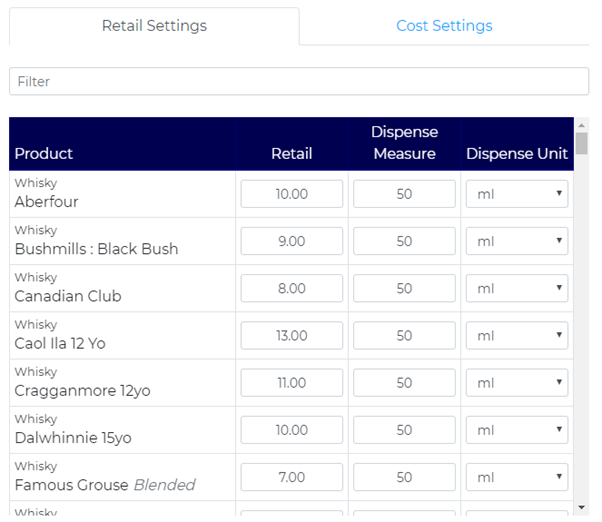
This capture shows the first screen that appears. This is to set the retail prices and the standard measure size for the product. Different products require a slightly different way of setting them up. Below is an example for each major category;
Spirits;

Wine

Bottled Beer

Bottled Minerals/Mixers

Draught

Post Mix

Change Cost Settings
To change the cost settings, navigate to the ‘Cost Settings’ Tab at the top of the page. This will change the screen and display the following;
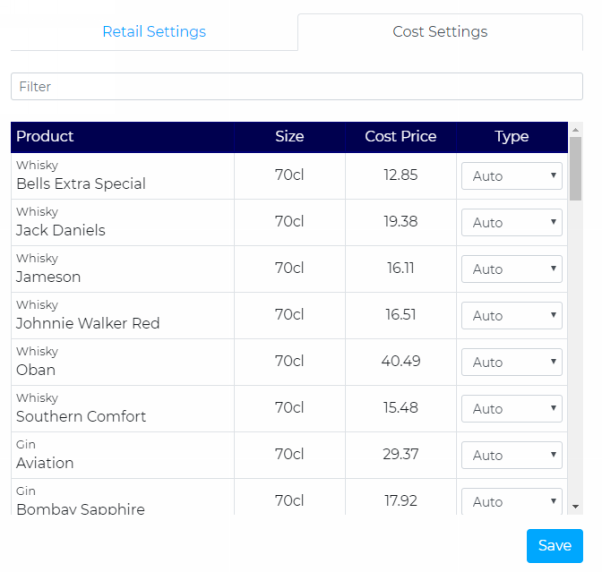
From this page, you are able to update any cost prices. To change a cost price, click on the drop down box and change the value to manual.

When this has been selected, you will be able to type over the cost price with the new, updated price.
Spot Checks
What is a Spot Check
A spot check is a function that allows the user to do a small count on particular items that may have been highlighted as a risk in a previous stock. This will include the opening count, deliveries and a closing count so you are able to track the movement of an item on a daily/weekly basis.
spot check
noun
a test made without warning on a randomly selected subject.
"I conducted a spot check on Smirnoff Vodka"
Complete a Spot Check
To start a Spot Check, navigate to the Spot Check tab on the left hand side of the page. When this opens, click the ‘Start Spot Check’ button in the top right hand corner. This will bring up the following menu;
Fill in the relevant information for the site and click on ‘Start Spot Check’.
When the Spot Check is created, it will show in the 'Open Spot Checks' area, follow the normal stock taking procedures to continue with the spot check.

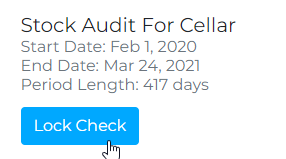
When the spot check is completed and reviewed, you are able to Lock the spot check. This will set the basis for any future spot checks.
Recipe Settings
What are Recipe Settings and Why Do We Use Them?
recipe
/ˈrɛsɪpi/
noun
- a set of instructions for preparing a particular dish, including a list of the ingredients required.
A recipe in this instance would be for a drink, i.e. a cocktail
We use recipe settings alongside EPOS codes for auto till imports to deplete the necessary stock for all drinks that are sold through the till.
How to Update Recipe Settings
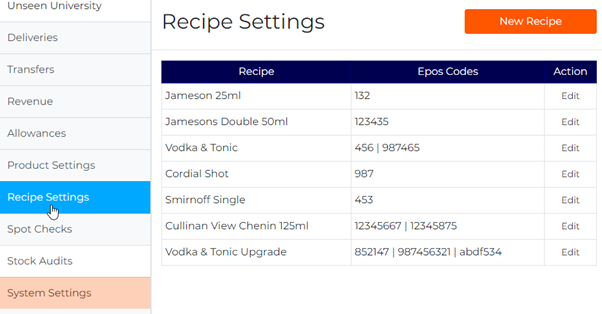
When you click on the Recipe Settings tab on the left hand side, it will come up with a list off all Recipe settings that are currently being used by the site.
To edit any of these, simply click on ‘Edit’ and a new screen will show the following:

From here you are able to change the measurements for each ingredient.
To change the product in an existing Recipe, use the search bar at the bottom to search all of the sites products and click the add sign to add it. You can now click the bin icon next to the old item in order to remove it from the Recipe.

EPOS Codes
If you click on the EPOS Codes tap at the top of the page, the following screen appears:
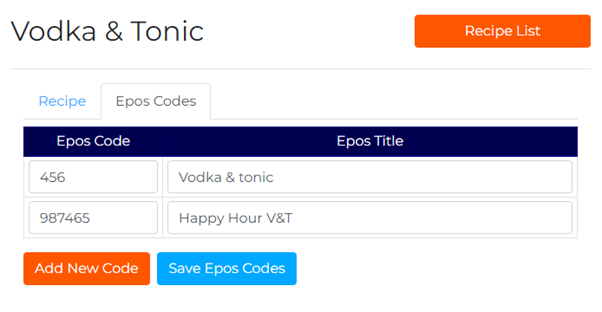
From here, you can add the EPOS codes and their relevant titles, in the above case there are two codes for the same recipe, due to an offer being in place. This is because the tills are set up to have a different button depending on when the offer is live.
To add a new EPOS Code to an existing Recipe, click 'Add New Code' button and this will create a new line to enter details in.
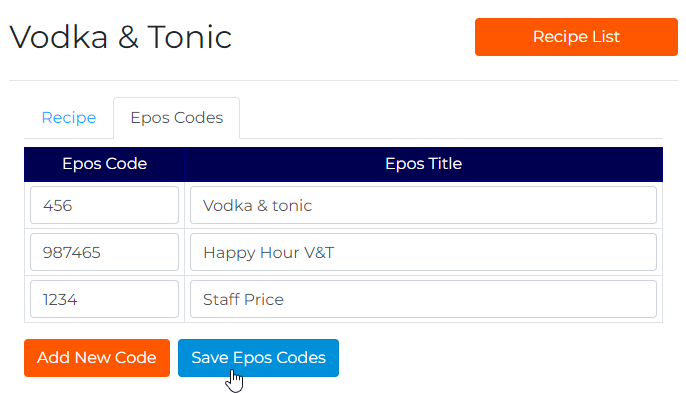
When this has been typed in, click 'Save EPOS Code' and this will be saved.
Adding a Recipe
To add a new recipe, click on the 'New Recipe' button at the top of the screen.

This will bring up a new screen requiring you to name the new recipe that you are setting up.
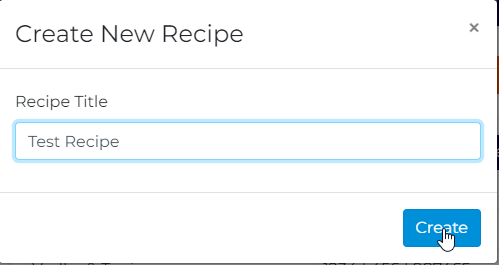
Once you have named the recipe, click 'Create'
From the next screen, you are able to search for the products to add to the recipe and click the plus button

When the product(s) have been added, you set the serving sizes as follows:
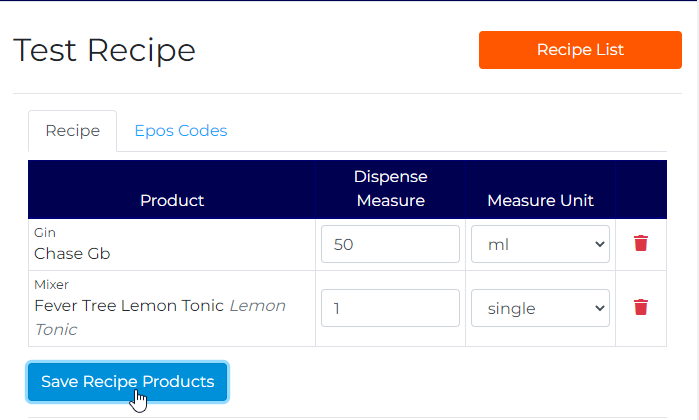
When you have added all of the products that are needed, click save.
When you return to the Recipe List, you will see your newly created recipe.
Stock Audits
What is a Stock Audit
A Stock Audit is a way to ensure all stock movements are being recorded correctly and all stock used is accounted for. This is also a way to ensure that all deliveries have been processed correctly.
Starting a Stock Audit
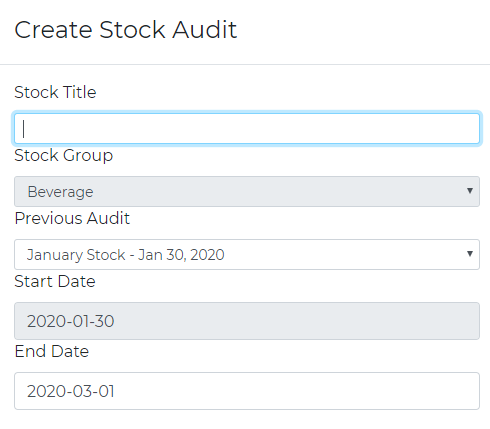
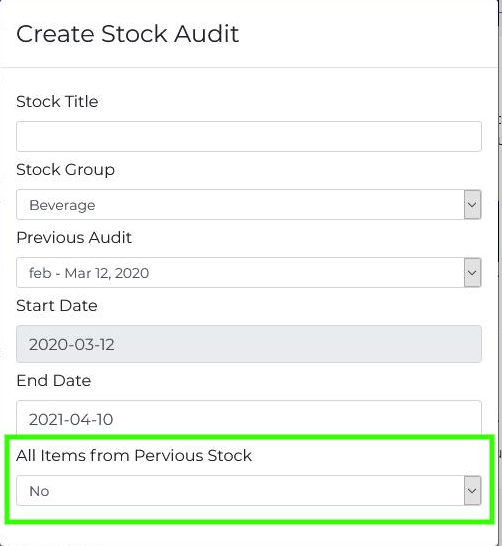
To start a Stock Audit, navigate to the Stock Audits tab on the left-hand side of the Home Screen. Then, click on the ‘Start Stock Audit’ tab in the top right-hand side. This will bring up a pop-up, where you can enter a title for the Audit, choose the correct Stock Group, select the previous Audit for a starting stock and the end date of the Audit you are processing. Once this pop up has been filled correctly, a blue button at the bottom of the pop up will appear called ‘Start Audit’. This will then put your stocktake in the ‘Open Stock Audits’ section of the Stock Audits page. This will allow you to create count sheets and import the counts.

When you create the Stock Audit, you can tell the system to include all items from previous stocks, regardless of their open/closing value being zero. This will be helpful when doing food stocks as items will not drop off the countsheets.
Creating Countsheets
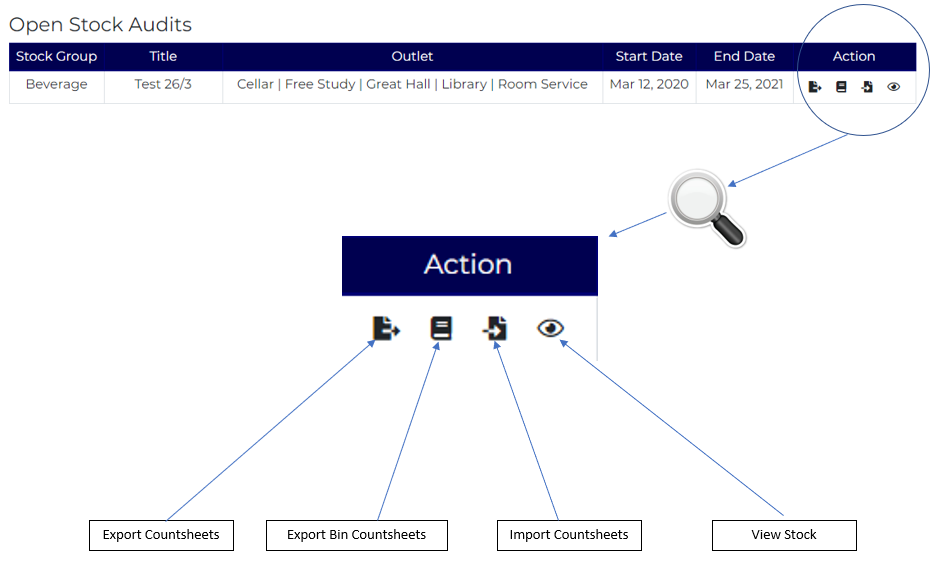
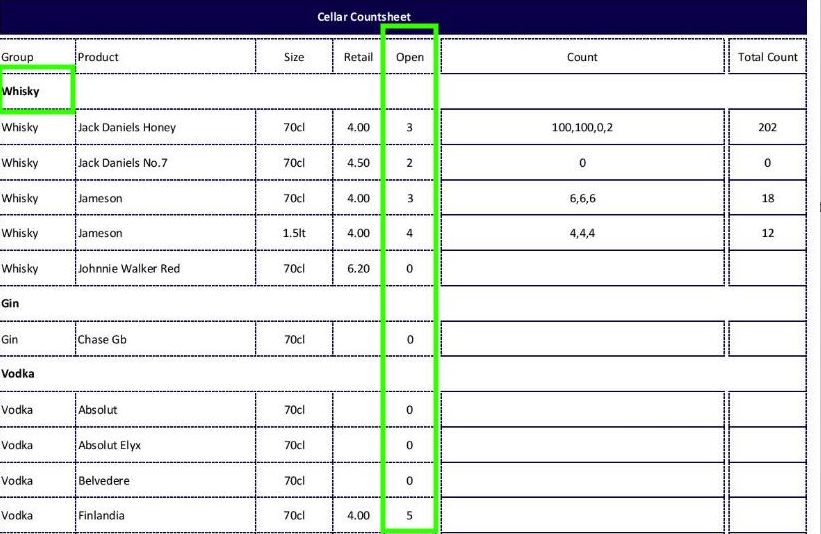
To create a countsheet, go to the relevant Stock Audit, and select the link on the right-hand side called ‘Export Count Sheets’. This will bring up the ‘Save As’ pop up. This file is to be saved in a memorable place. This will create an Excel file that will contain the countsheets for all outlets within the business. This can be printed and become your countsheets for the job. Complete the count on these sheets and type in the totals when the count is completed
Importing Completed Countsheets
Once the count has been completed and all counts are totaled on the Excel file, navigate back to the Stock Audit Screen. The link below the ‘Export Count Sheets’ link is called ‘Import Count Sheets’. When this has been selected, a pop up will appear. Use the ‘choose file’ option to upload your completed file. The upload type can be changed from ‘Appending to Existing Counts’ (If you want to add to counts) to ‘Reset All Counts’ (to enter fully new counts).
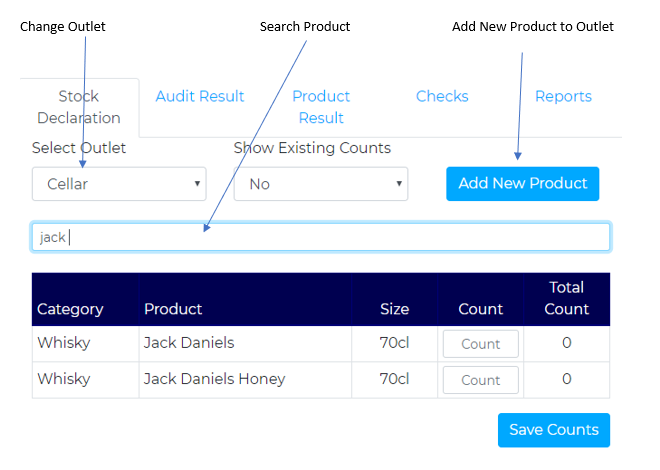
If you wish to enter the count via the online platform as opposed to using count sheets, you can do this via the 'View Stock' icon. From here you will be able to click on the 'Stock Declaration' tab at the top of the screen.
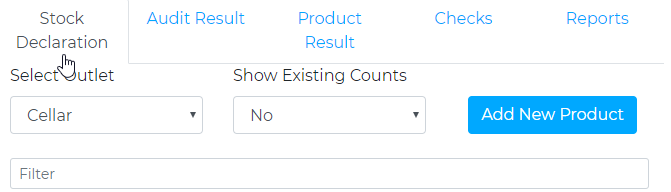
This will open all items within the outlet. From here you are able to choose the outlet, search for a product and add new products to the outlet.
Reviewing the Completed Stock Audit
When the count has been input, you can click on the ‘View Stock’ Icon (represented by an eye). This will take you to the overview of the counts. This is where you can make any amendments that are necessary as well as reviewing your entry.
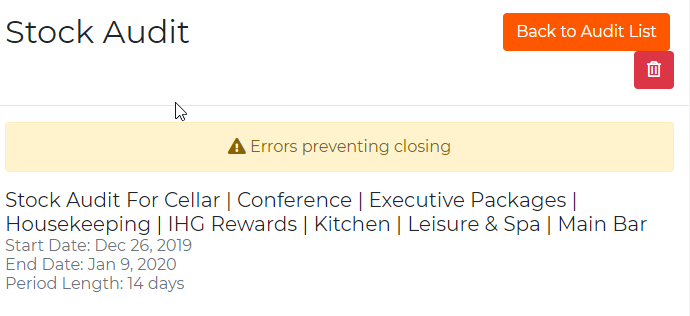
- Errors
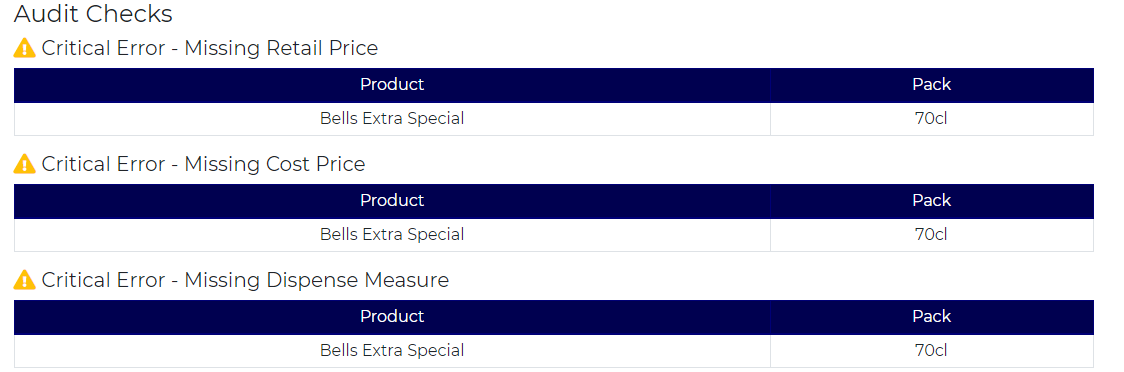
Errors prevent the stock from being locked.If an 'error' is found, the system will display the following at the top of the screen;

To investigate these errors, navigate to the 'Checks' Tab:
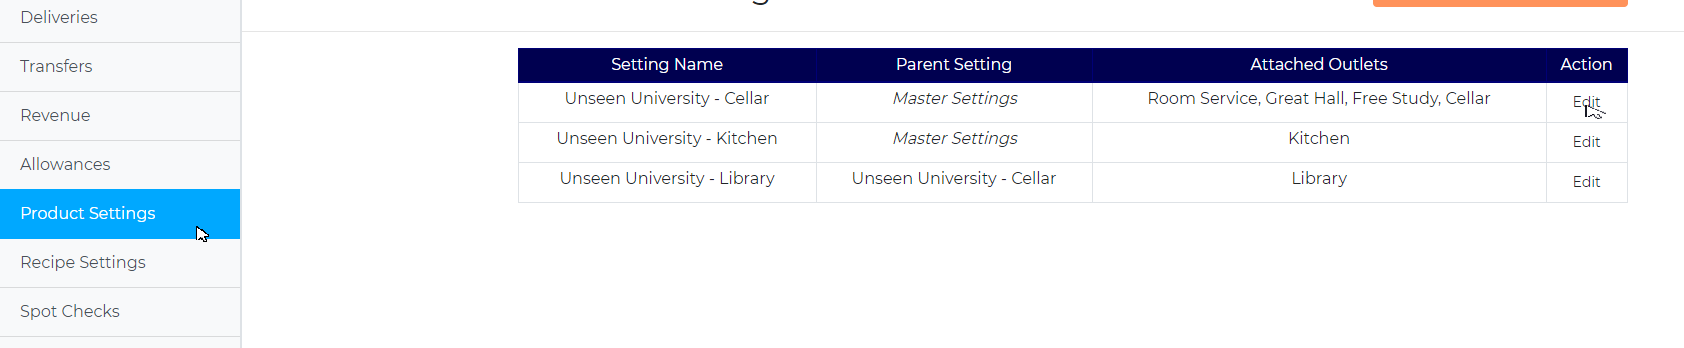
To correct the selling price and the dispense measure errors, navigate to the 'Product Settings' tab and select edit on the 'Master Settings'
This will automatically take you to the 'Retail Settings' tab. Any product within this list with missing information will be highlighted as below;

Simply enter the values and press save.
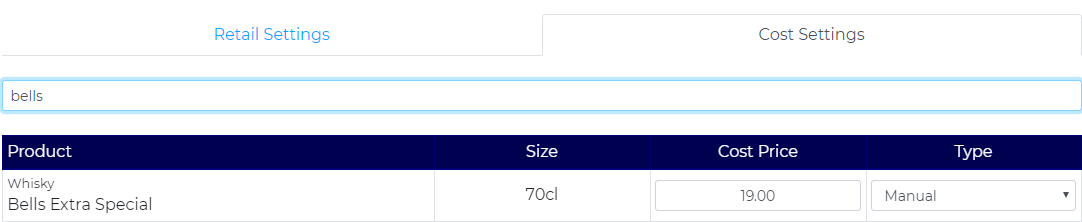
To correct the cost price, navigate to the 'Cost Settings' tab.

Search for the product you wish to update, change the 'Type' to 'Manual' and enter the cost price for the product.
The actions will clear the errors, and will enable the Stock Taker to lock the stock.
Audit Result
When you have confirmed all of the counts are correct, you are able to click on the Audit Result Tab. From here you will see four tables (as pictured).
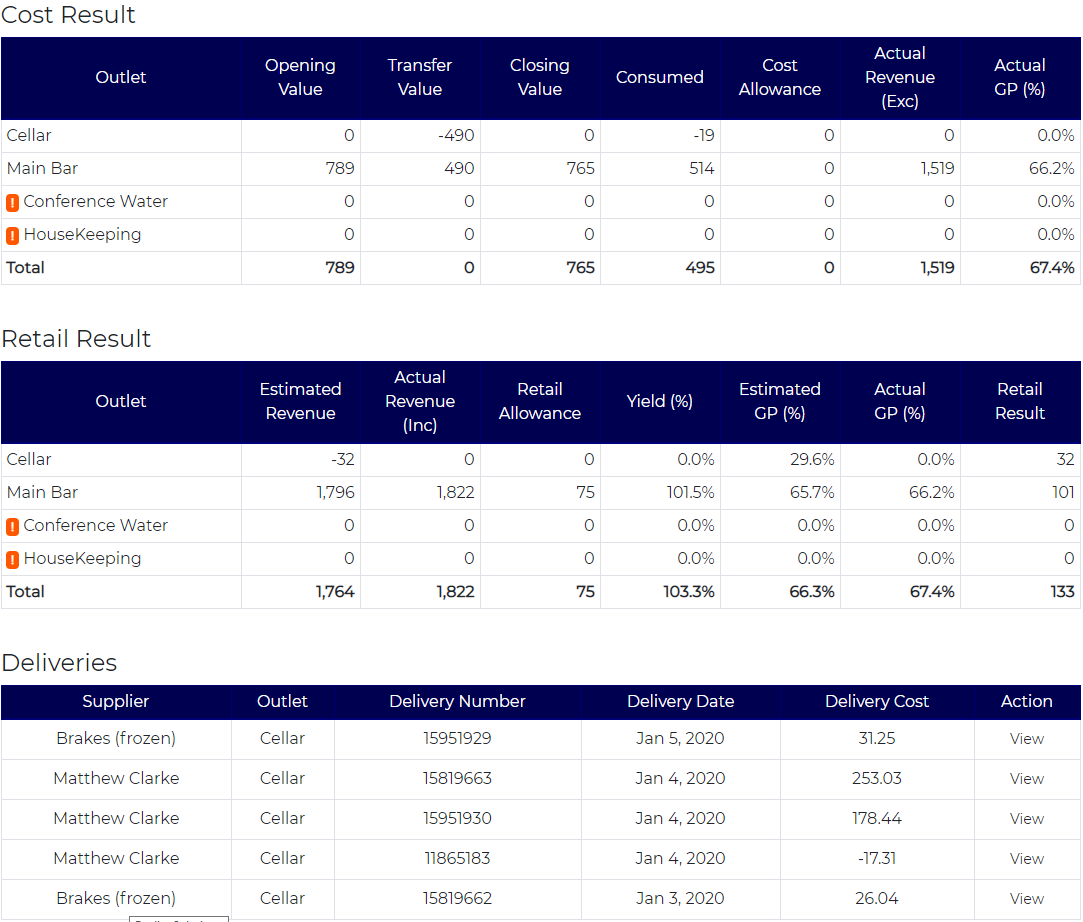
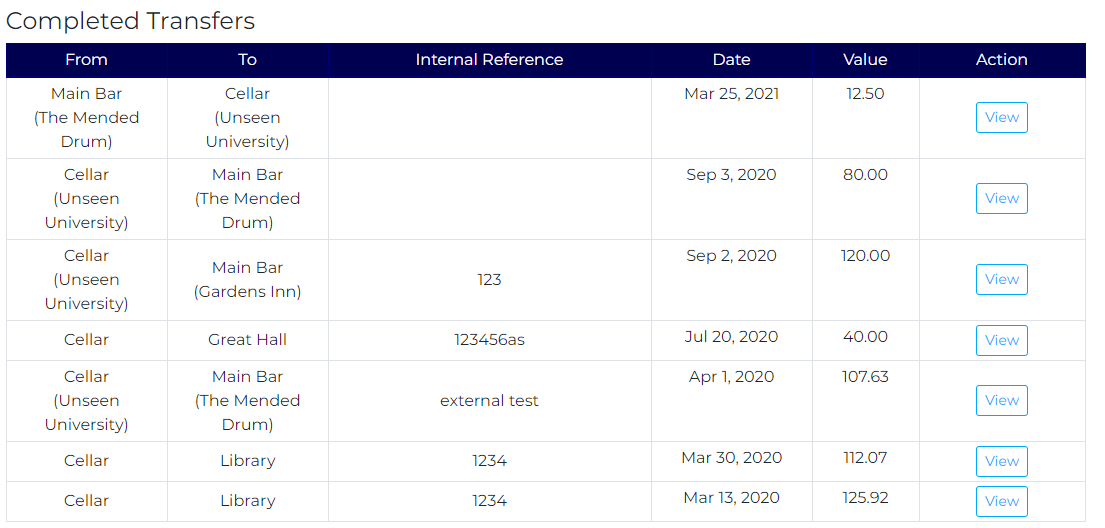
The top table is the cost result, showing transfers and consumption values. This table also shows the closing value of the inventory. The second table is the Retail result. This where you can see the surplus/deficit and GPs produced by area within the business. It also displays the Yield, and Estimated GP. The third table shows the deliveries for the current stock period. The final table shows the transfers for the relevant period.
Product Result
From the product result tab, you can see the information for each product. The headings break down each product, opening count, delivered amount, transferred amount, closing count, consumed value and estimated receipts. Here you will be able to identify any erroneous values in deliveries or transfers. You can also use this page to review your entered figures.

Reports
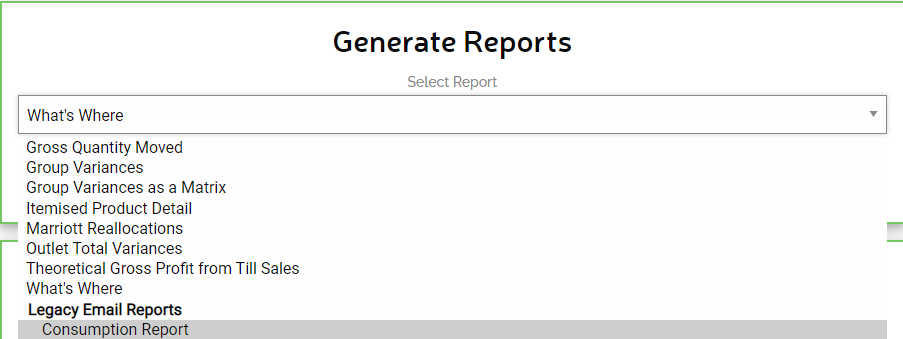
When reviewing the result of the Stock Take, click on the reports tab in the top-right corner.
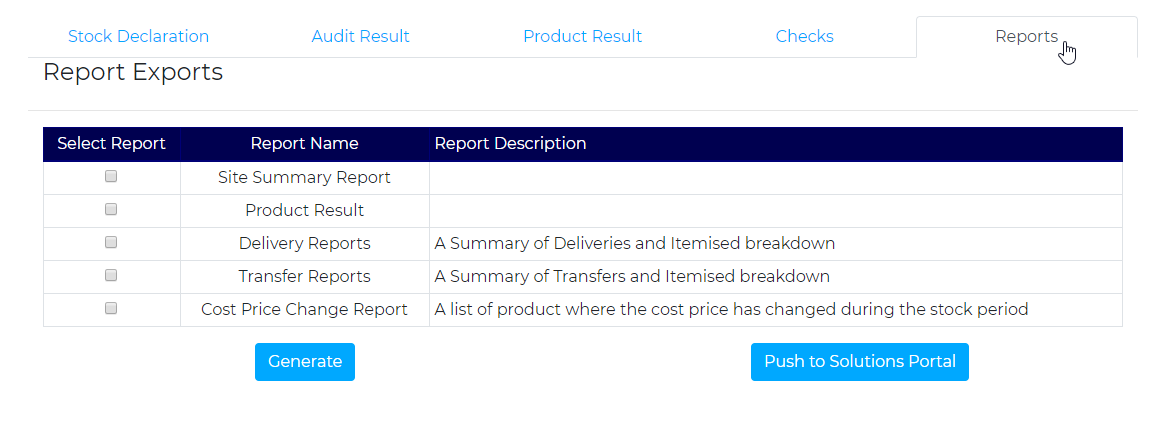
This will open up a list of the available reports for the relevant stock. Below highlights what each report is used for;
| Report | Use |
| Site Summary Report | Provides an Excel version of the result tables |
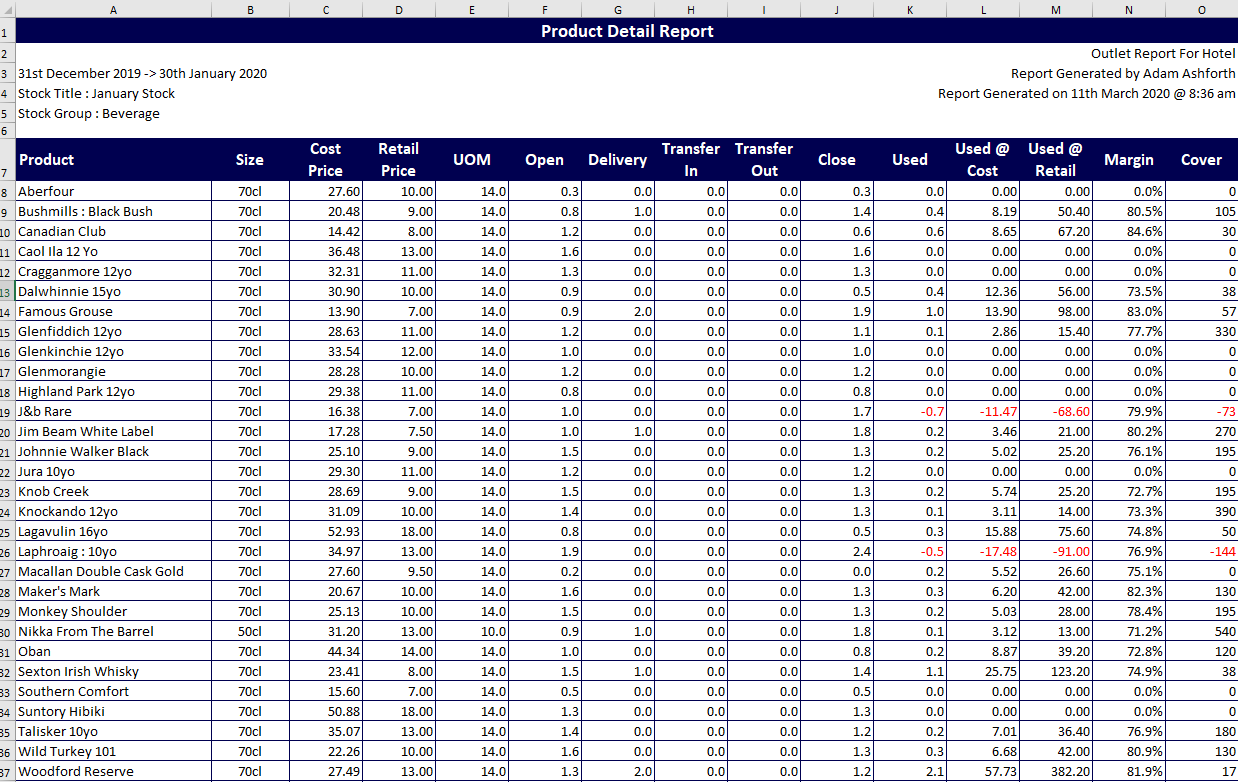
| Product Detail Report | Outlines all items with their Cost Price, Retail Price, UOM, Open/Closing counts, Deliveries and transfers. This report also highlights the SOH cover for each item and its respective GPs. A separate tab for every outlet/bar/cellar will be created |
| Delivery Report | Shows all deliveries and their values for the respective period |
| Transfer Summary Report | Details all transfers within the business (i.e. requisitions) within the current period |
| Cost Price Change Report | Highlights all Cost Price Changes, with the opening cost and delivered cost. It will identify which delivery notes are associated with the change of price to aid any investigations needed. |
An example of each report is seen below;
- Site Summary Report

- Product Detail Report
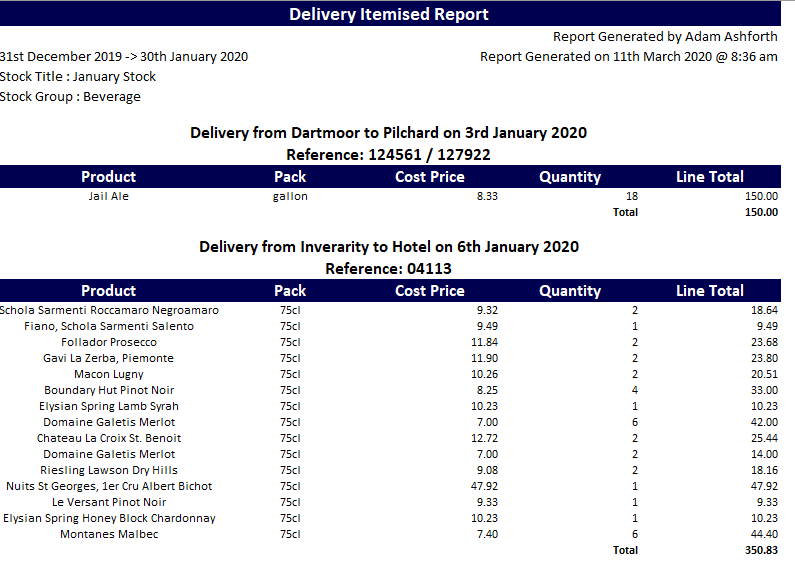
- Delivery Summary

The delivery summary also creates an itemised by delivery summary tab as seen below;
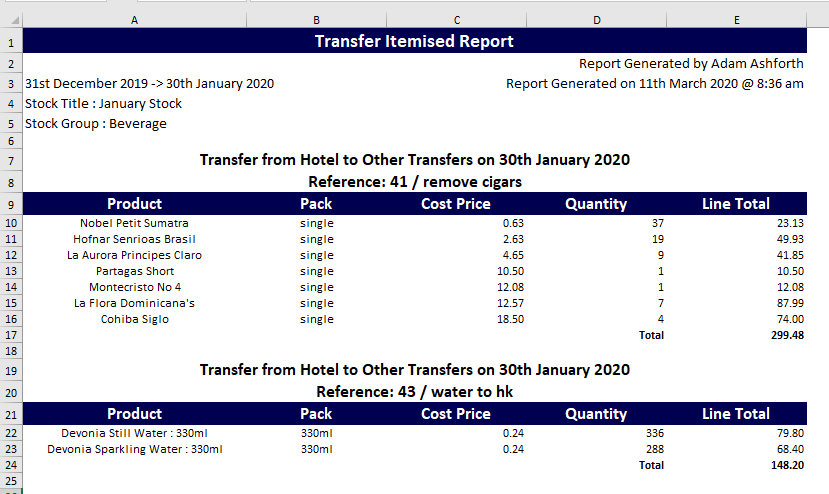
- Transfer Summary
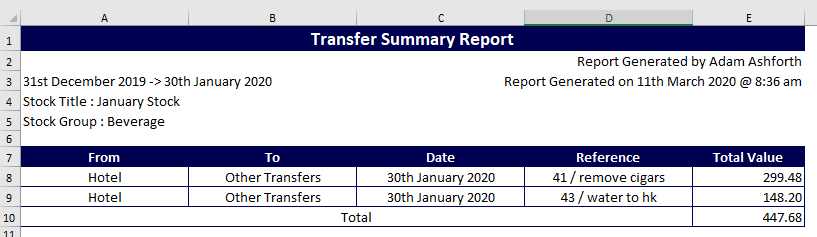
This, like the Delivery Summary, produces an itemised version also;
- Cost Price Change

If you have access to Capcon Reality's Portal you can import the stock into the Solutions Tool Box, select the 'Product Result' report and click 'Push to Solutions Portal'.
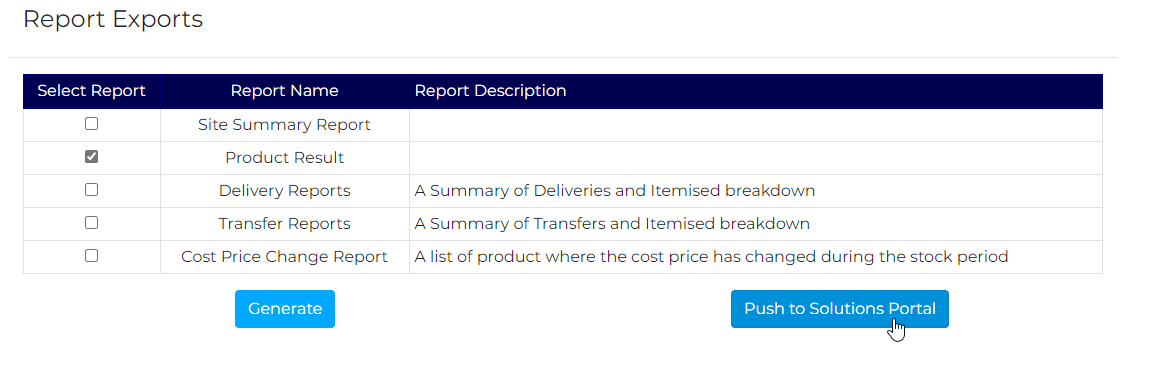
This will then appear within the Tool Box under the user name 'System'
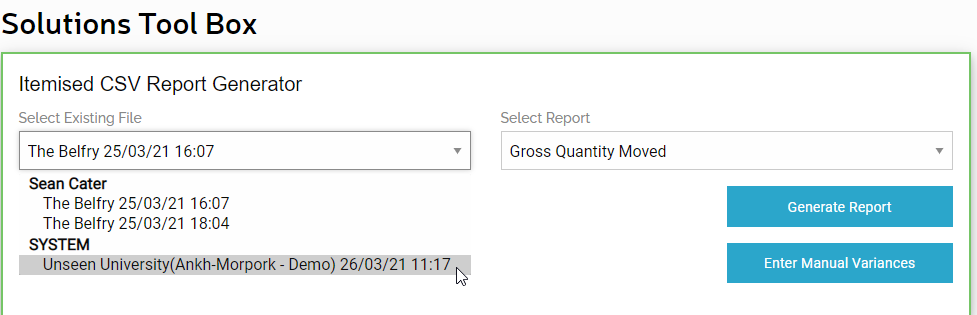
From here you will be able to access the reports listed below, as well as being able to manually enter the till sales.
Deleting a Stock Audit
To delete and Audit, click on the bin at the top of the page.
This will then prompt a pop up confirmng the deletion of the Audit.

The deleted stock will now have disappeared from the Open Stock category on the Stock Audits page
Completing a Food Audit
To complete a food Audit, you set it up in the same way as the liquor audit, however ensure that the type of stock has been amended to select the food stock.

When setting up the stock you can include all items from the previous stock to ensure all items (even when the open/close count is zero) are available on the countsheets.
To export/import the countsheets you follow the same processes as a liquor audit.
To add deliveries, you can add the cost element of a delivery as follows:
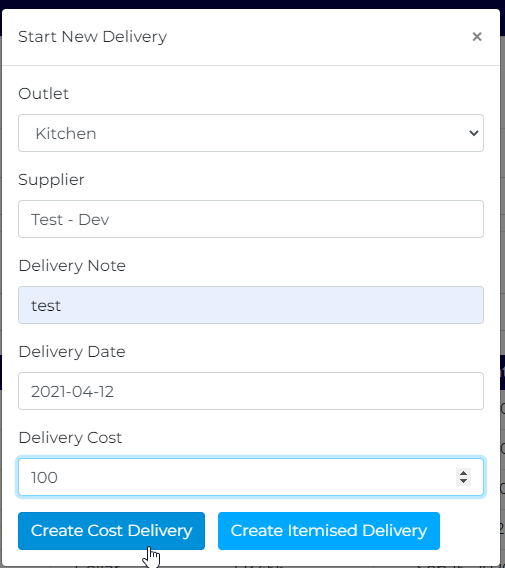
You are also able to create itemised deliveries in the same way that you create a liquor delivery.
To see the deliveries, change the stock group in the top left hand corner to the relevent area:
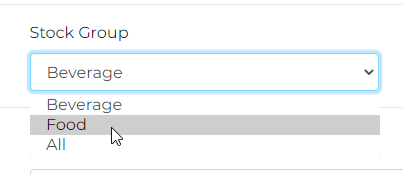
This will bring up a list of all deliveries that are associated with the relevent stock group:
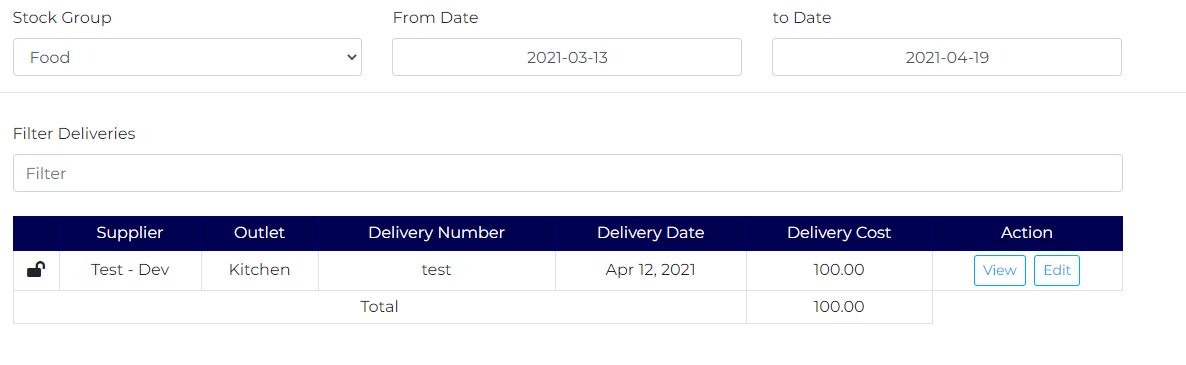
From here, you are able to view, edit and delete any delivery. You can change the date range at the top to ensure all relevent deliveries can be viewed.
To view the stock result after the count has been inputted, click on view Audit and it will come up with the following screen:
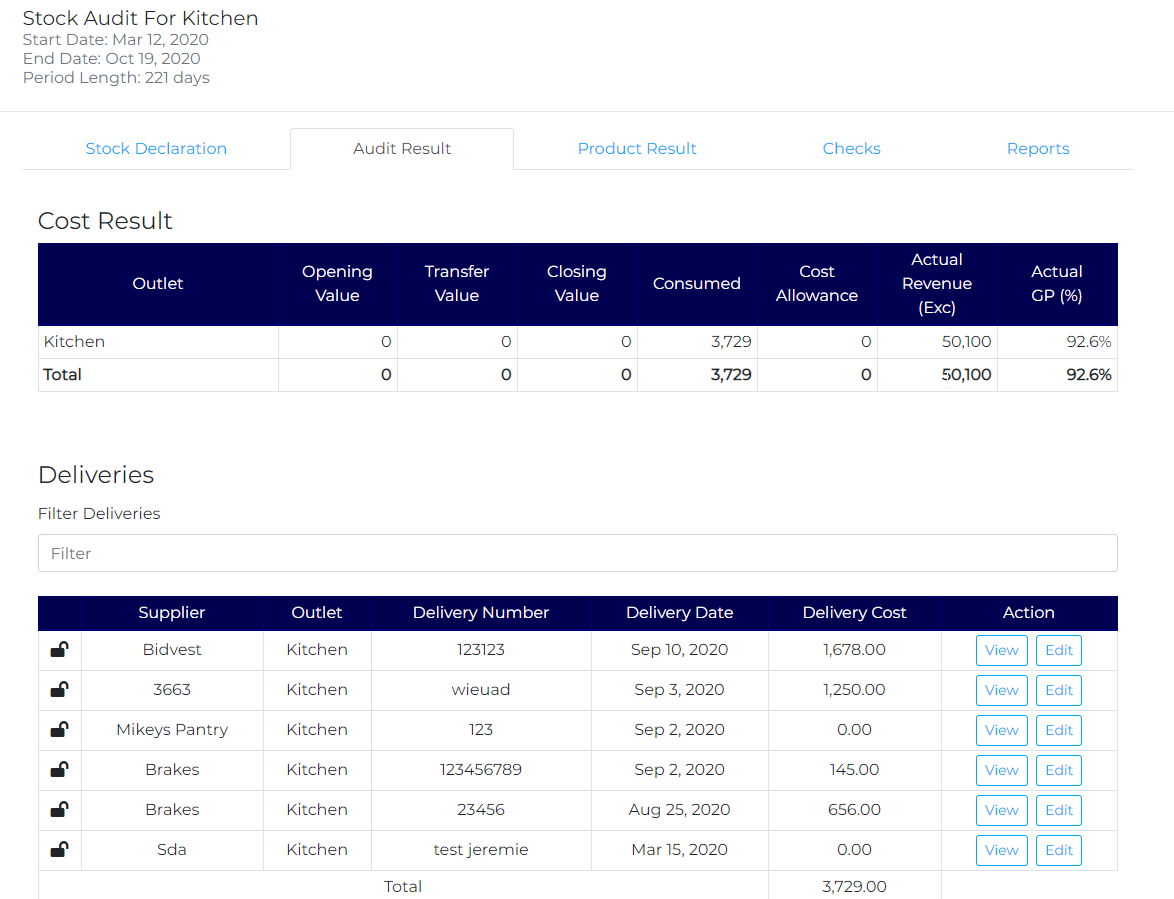
The first table shows you the breakdown of opening value, transfer value, closing value, consumption value, allowances (cost), Revenue and GP produced from the inputs.
The second table shows all deliveries that are associated with the current stock period.
The product result shows you itemised products and their opening/closing counts in order to sense check.
Uploading Till Sales
Importing Sales to SC.IO
Sales Import User Guide for SCIO


From here you will see the above screen. If you are importing for a NON Kew Green / TableTop site, select [2a] for the SC.io template. Use the sample template [3] to convert your till file into one that is readable by SCIO:

Save this file and then import it via [4].
If you are importing for a Tabletop site, select [2b] from the drop down. This will read the Tabletop report as it is, so no amending of the report is necessary. It will, however, pick up all of the food sales. It is advised to delete these from the file prior to importing:
Highlight the headers row and navigate to ‘Sort & Filter’ and select Filter.

This will create drop down boxes on all headers. From here, select the ‘Grouping’ Header and untick everything apart from ‘Food’

From here, it will only show the food items within the report. Highlight all rows with products, right click and select ‘Delete Row’

Coding for SCIO
Once the file has imported, any outstanding codes will appear here:


From here, select the code type (primary for main selling option the UOM is set for the product) or secondary (for a multiple or glass)
In this case, Erdinger is sold by the bottle so is therefore a primary code. Once Primary code is selected, search for the product it is relating to, select the product, and click add. This code has now been added and the missing code will be removed from the unassigned codes list.

Secondary codes are for when a product is sold in a multiple (for example a double gin) or a glass from a product (for example a 125 ml measure of wine).
In this case, it is a double Disaronno, and is therefore a secondary code.
Follow the same steps as above to find the product, however with a secondary it will ask for the measure size as well.

Once this is filled out, click add.
Cocktails tops and shandies are to be added via ‘New Recipe’. Once new recipe is selected you can search and add the products that are required.

In the case of this example, it is for half a stella top. For this, you will add Stella and R Whites Lemonade. The measurements are therefore what the site uses, in this case it is 0.45 of a pint of lager and 0.05 of a pint of lemonade. This automatically saves as you enter it so simply click the ‘X’ when completed.

Overview & Key Terms
Key Terms
| Key Term | Definition |
|---|---|
| Yield | Yield is a number of servings from a particular product (i.e. 8 pints in a gallon) |
| Gross Profit (GP) | Gross profit is the profit a company makes after deducting the costs associated with making and selling its products, or the costs associated with providing its services. This is often given as a percentage. |
| Cost of Sale (COS) | Cost of Sale refers to the direct costs of producing the goods sold by a company. This is often given as a percentage. |
| Stock Holding (Days) |
Stock Holding is the value of goods, such as parts, materials, and finished products, that a company has available at a particular time. This can be calculated in order to calculate the number of days cover the business has in its inventory. This is calculated by conducting the following calculation:
(Close Stock / Consumption) x days in the stock period |
| Surplus | A surplus describes the amount of an asset or resource that exceeds the portion that's actively utilised. A surplus can refer to a host of different items, including income, profits, capital, and goods. |
| Deficit | A deficit is an amount by which a resource, especially money, falls short of what is required. A deficit occurs when expenses exceed revenues, imports exceed exports, or liabilities exceed assets. A deficit is synonymous with shortfall or loss and is the opposite of a surplus |
| Delivery | Delivery is the receipt of goods following order, for example, a liquor stock order. |
| Allowance | An allowance is a monetary figure that compensates for a shortfall in revenue. An example of this is within cocktails. If a shot of Vodka has a retail price of £4.00 and a bottle of Tomato Juice is set at £2.50, but a Bloody Mary has a retail price of £5.00. The stock would be expecting £6.50 for this drink due to the retail prices of the ingredients. a £1.50 allowance is given to compensate for this shortfall. |
| Revenue | Revenue is the income that a business has from its normal business activities, usually from the sale of goods and services to customers. |
| Gross | Gross in a financial sense means an initial amount before any deductions, expenses, or withholdings. |
| Net | Net income is the residual amount of earnings after all expenses have been deducted from sales. |
| Discount | Discount is a deduction from the usual cost of something |
Logos & Icons
| Icon | Meaning | How to Use |
|---|---|---|
|
|
Change Password | Enables the user to change and update their password |
|
|
Change Site | Enables the user to be able to change to different client/site |
|
|
Log Out | Enables the user to be able to log out when not using their account |
|
|
Export Count Sheets | Enables the user to download the Count Sheets ready for the count to start |
|
|
Import Count Sheets | Enables the user to upload their completed Count Sheets |
|
|
View Stock | Enables the user to review the inputted stock, or to enter the count via the online platform |
|
|
Delete | Delete the relating Delivery/Revenue Entry/Allowance |
|
|
Password Reset | Enables the user to reset their password. The user has three attempts at their password before their account is locked. |
|
|
Login | Login into the Stock Controls website |
|
|
Saved | The current page has been saved successfully |
|
|
Declare | Starts the action of declaring Revenue/Allowances |
|
|
Start | Enables the user to start a Delivery, Transfer, Stock Audit or Spot Check |


At a Glance
Adding Revenue

Adding Allowances

Creating a Delivery

Start a Stock Audit
